Ardour - How to load a Drum Map with MIDI note names (pitch names)
Why even use a drum map?
When you open a MIDI event with the MIDI editor in Ardour, you will see the piano roll on the left side. The C keys and their octaves are all labeled, which is sufficient if you just have to deal with melodic MIDI events. But as soon as you want to edit or create drum grooves, only seeing the keys and notes is not very convenient. That is why some DAWs like Studio One support loading up external drum maps which will display every single drum name like Kick, Snare, Hi-Hat etc... instead of the piano roll (see right image).
This obviously makes drum programming much more convenient since you are going to actually see which drums you are about to draw into the MIDI editor. The guessing game will be over.
Step 1
Download the followig zip file and extract the drum map to any temporary location on your drive.
Step 2
Move the drum map file to the location below. You may have to create the folder patchfiles yourself, if it doesn't exist yet. Restart your DAW afterwards.
Windows:
C:\Users\[your user name]\AppData\Local\Ardour[Version]\patchfiles\
Mac:
~/Library/Preferences/Ardour[Version]/patchfiles/
Linux:
~/.config/ardour[Version]/patchfiles/
Please note that this drum map file only works with Ardour. Other DAWs like Cubase and Reaper have their own drum map file format. You can find drum maps and instructions for these DAWs within the Presets section of this website as well.
Step 3
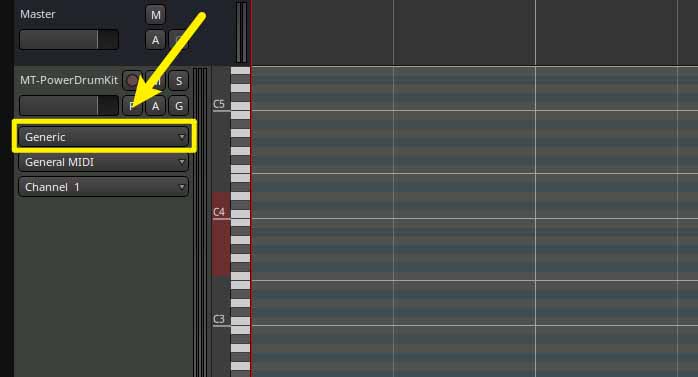
Exapand the MIDI drum track and click on the dropdown menu where 'Generic' is pre-selected.
Select Manda Audio ➔ MT-PowerDrumKit 2 from the dropdown menu.

Step 4
That's it! Whenever you go into edit mode on that track (Shortcut E) the note names will display next to the piano roll.

Enjoy enhanced and more convenient drum programming!


