Cakewalk / Sonar - How to load a Drum Map with MIDI note names (pitch names)
Why even use a drum map?
When you open a MIDI event with the MIDI editor in Cakewalk, you will see the piano roll on the left side. The C keys and their octaves are all labeled, which is sufficient if you just have to deal with melodic MIDI events. But as soon as you want to edit or create drum grooves, only seeing the keys and notes is not very convenient. That is why some DAWs like Cakewalk support loading up external drum maps which will display every single drum name like Kick, Snare, Hi-Hat etc... instead of the piano roll (see right image).
This obviously makes drum programming much more convenient since you are going to actually see which drums you are about to draw into the MIDI editor. The guessing game will be over.
Step 1
Download the followig zip file and extract the drum map to any temporary location on your drive.
Please note that this drum map file only works with Cakewalk / Sonar. Other DAWs like Cubase and Reaper have their own drum map file format. You can find drum maps and instructions for these DAWs within the Presets section of this website as well.
Step 2
Put the previously extracted drum map file into the following Drum Maps folder:
Sonar:
C:\Users\[your user name]\AppData\Roaming\Cakewalk\SONAR\Drum Maps\
Cakewalk:
C:\Users\[your user name]\AppData\Roaming\Cakewalk\Cakewalk Core\Drum Maps\
Side note: In this folder you will encounter many other drum map files which you probably don't need. You can move them to a different location on your drive, leaving only the ones you need, like the drum map for the MT Power Drum Kit (thank me later).
Step 3
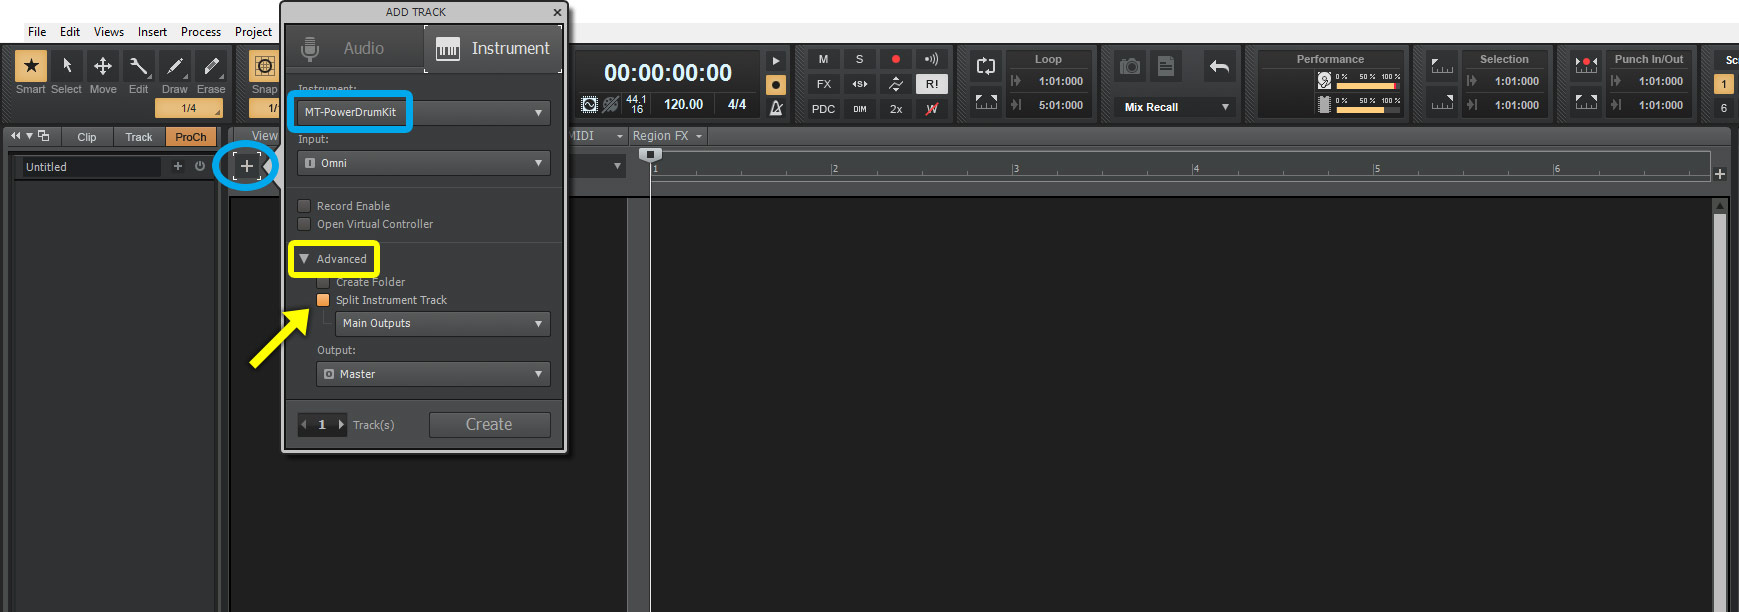
In order to use the drum map in Sonar or Cakewalk the MIDI track and audio track of the virtual instrument have to be displayed seperately in the track list. You can achieve that by clicking on the PLUS button at the top of the track list (blue circle) and then selecting the Instrument tab. As instrument select the MT Power Drum Kit plugin (blue rectangle mark) and then make sure to expand the Advanced section and enable the Split Instrument Track function (yellow arrow).

Step 4
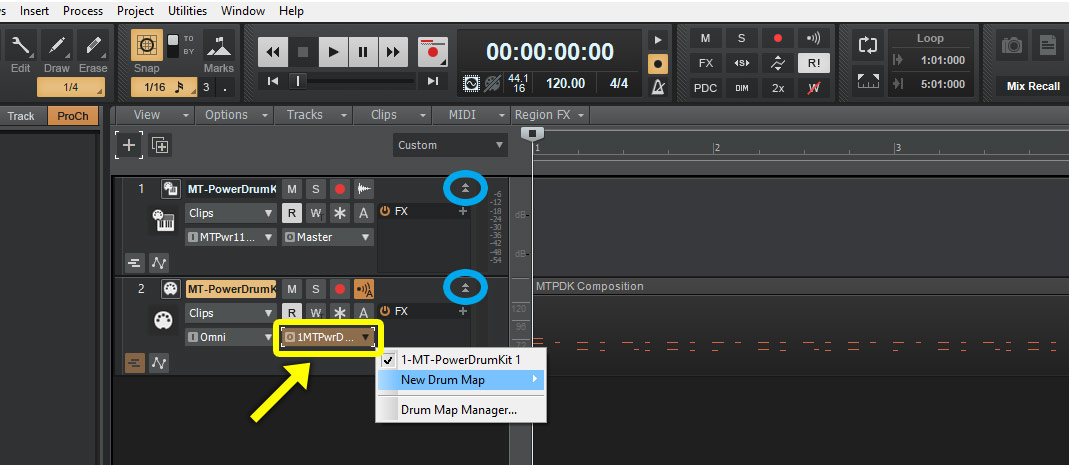
After the tracks have been created, expand them by clicking the double arrows pointing downwards (blue circles). Now go to the Grooves section of the MT Power Drum Kit and drag any groove, fill or groove-fill combination to the MIDI track, which is the lower one of the two created tracks.
After that click on the Output button (yellow mark/arrow) of the MIDI track and select New Drum Map from the drop down menu. In this menu there will appear all the files from the previously visited Drum Maps folder. If you haven't moved the unnecessary drum map files out of the folder earlier, as suggested, you have to scroll down a lot now to reach the MT-PowerDrumKit_DrumMap file.

That's it! When you double-click on the MIDI events of that track, they should now display drum names instead of the piano roll.
Enjoy enhanced and more convenient drum programming!


